What Are Blockchain Casinos and Do They Have Limitless Potential

Crypto casinos are often associated with safety and incredibly fast transactions. What’s more, it’s an undeniable fact that more and more individuals are starting to use cryptocurrency rather than fiat money. Many of these people believe that digital currencies will gain the upper hand in everyone’s lives. That’s why they take their time to conduct thorough research that’ll help them decide what is the best crypto to invest in.
It’s obvious that crypto is now supported in numerous businesses and platforms, including online casinos. In fact, the number of crypto gambling sites has grown immensely over the last couple of years. Betting enthusiasts are eager to join them and to experience the thrill of gambling with crypto. But will this hype be forever, and do crypto casinos have a lot of benefits? Take a look at the following sections to find out.
What Are Blockchain Casinos
In the simplest terms, blockchain casinos are betting platforms that allow users to top up their balances with cryptocurrencies rather than fiat money. Put differently, instead of providing your debit card’s information and adding EUR or USD to your account, you’ll need to connect your crypto wallet to your casino account.
There are many decentralized wallets many players prefer to use. The reason being is that these wallets are managed only by the respective owners. Customers of blockchain casinos may add funds to their balances in the form of ETH (Ethereum), BTC (Bitcoin), SHIB (Shiba), or any other cryptocurrency that’s accepted on the respective website.
Benefits Associated with Blockchain Casinos
Undeniably, crypto casinos have a number of perks. One of the most considerable ones is the fact that they are associated with greater security and protection. The reason being is that every Bitcoin or other crypto transaction made by a player goes through several encryption and verification processes. Many crypto wallets use the so-called 2FA verification method, which requires the user to add a unique code received on their smartphone, for example, whenever they make a payment.
Needless to say, to ensure a completely safe betting experience, you should be careful with your choice of a blockchain casino. Just like regular gambling platforms, these ones should also be investigated in advance. We recommend you read reviews written by professionals, as well as opinions provided by other customers before joining a particular crypto casino.
Another major perk of playing in crypto casinos is the fact that you won’t have to wait for days until your deposit arrives. Crypto transactions usually get completed within several minutes, which means that you’ll be able to engage in playing at a time suitable for you. Withdrawals are quite swift, as well.
What’s more, crypto transactions are usually subject to minimal fees. As some of you know, some e-wallets that use fiat money often charge users considerable taxes whenever they make a deposit or withdrawal. Fortunately, on blockchain casinos, players will not be obliged to pay sufficient sums when topping up their balances.
Do Blockchain Casinos Have Great Potential
Those who are not quite familiar with the crypto world are a bit skeptical about blockchain casinos. Many people believe that, just like anything else in this world, the popularity of crypto casinos is temporary, as well. However, we are not certain that this is true. The reason being is that digital currencies certainly gain more popularity every single day.
Additionally, considering how many bettors choose to join blockchain casinos rather than regular ones is a sure indication that the number of crypto adherents is not insubstantial at all. Users are mostly attracted by the idea of withdrawing winnings in the form of a particular cryptocurrency. The respective sum goes straight to the player’s crypto wallet, and they can exchange it for fiat money whenever they want.
In other words, at the end of the day, you may get more than you’ve given. That’s because the price of any digital currency fluctuates throughout the entire time. Thus, in a few weeks’ time, or even in a couple of hours, its price may increase drastically, and you may end up gaining hundreds of dollars without spending additional cash.
The Future of Online Gambling
Many people are certain that blockchain casinos will become even more prevalent in the upcoming years. Considering how widely accepted crypto has become, it won’t be surprising if the total number of reliable crypto casinos increases. As you already know, trustworthy ones have numerous benefits, including low taxes, instant transactions, and complete security.
Additionally, all blockchain betting sites are fully responsive on smart devices, which is another thing that’s greatly prioritized by the majority of punters. And last but not least, as we’ve already mentioned, you may withdraw and exchange your crypto winnings at the best possible moment and end up getting more money than you’ve actually earned during your gaming experience.
 This blog is all about the various ways in which currently existing technology can potentially enrich the online casino market and make online gambling a more fun, immersive experience for everyone. But the keyword in that sentence is “potentially”. I’m not an industry insider with access to the latest technology in the realm of online casinos, nor am I a prophet or a time traveler who knows exactly what’s going to happen in the next 10-15 years. All I can do, as a guy who likes to keep up with current trends and play online blackjack every once in a while, is speculate. That’s it. I can say stuff like “Hey, I think it would be cool if these VR headsets that are all the rage now start getting used for online gambling”, but the truth is, I’ve got no idea if my kids are going to be playing their online casinos with VR glasses or if they’ll be staring at a screen clicking a mouse like the first people who played online roulette did almost 20 years ago. Because, let’s face it, online casinos aren’t exactly the most progressive.
 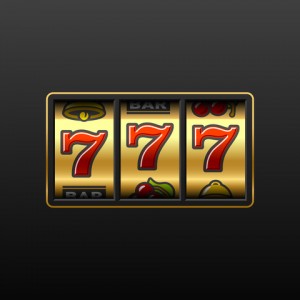 Everyone who’s ever visited an online casino – hell, everyone who’s ever visited a casino, period – knows just how popular slots are. They’re friggin’ everywhere! When you open up your favorite online casino, you’re bound to see tons and tons of slots, tens of times more than there are other games. It’s really not uncommon for there to be hundreds of slots, and hell, even some bigger physical locations have rows of the machines lined up and ready to play for anyone who’s a fan of the one-armed bandits! It doesn’t seem like their popularity is about to wane in the near future, but that doesn’t mean that they’re going to remain stagnant! I mean, slots have changed a LOT over the years – I mean, until relatively recently they were still fully mechanical, and now you’d be hard-pressed not to find an electronic slot that uses a nice, big LCD or OLED screen in lieu of reels. The thought of how much slots have changed – and how much they’ll keep on changing in the future – is what got me thinking. How are slots going to look in five years? In ten? In fifteen? Twenty? Well, I did a little research, looking into both their history and the new developments, and I think I’ve got a couple of good ideas!
 MMO games have been all the rage ever since Runescape came out and brought them into the mainstream (technically there were MMOs even before that, and if we go even further back there’s also the MUDs, but let’s not get technical), and it also doesn’t hurt that one of the biggest games of all time, World of Warcraft, was the MMO that basically defined the entire genre, turning it into a gigantic money-printing machine which only slowed down when “League of Legends” and the MOBA scene took its thunder. But why, oh why, you may be asking, am I going on and on about MMOs? Isn’t this blog about casino games? Well, if you haven’t realized it by now, I’m trying to butter you up in order to pitch you something I believe would be amazing – a Casino-based MMO.
 We’ve spoken before, at length, about the future of gambling – hell, this entire blog is specifically about this topic! We’ve discussed it at length, speaking about how virtual reality will allow us to enjoy gambling in a completely new way (a prediction which actually came true, as evidenced by the fact that Microgaming recently
 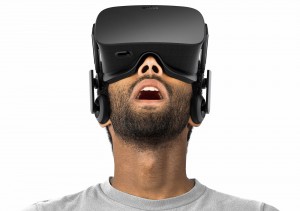 The Oculus Rift is, in some ways, one of the most important inventions of the 21st century, at least when it comes to entertainment. Virtual reality has been a coveted dream of science fiction authors for generations, right up until Oculus stepped in and announced that they could actually make it come true. They had the technology, and all we had to do was wait… and back up their Kickstarter campaign, of course. And back it we did, allowing Oculus to receive almost $2.5 million for the development of their Rift. In the four years since then, numerous companies, including Samsung, HTC, Google and Sony, have all attempted to create their own virtual reality headsets, with varying degrees of success. It’s no question that we’re currently living in the era of VR, for better or for worse. Despite the fact that half of the peripherals aren’t even out yet, we’re already seeing some major uses for VR not just for videogames, but also for simulations, movies, even online casino (as evidenced by the VR roulette prototype that Microgaming developed).
  Rejoice, friends and fans! “Grand Theft Auto V”, Rockstar’s mind-numbingly popular 2013 open-world game, whose online component sports hundreds of thousands of online players across the five systems it’s been released on, is finally getting new DLC that’s going to be adding the long-awaited casino features to both singleplayer and multiplayer… at least according to
  I usually write about the future of online gambling – what I feel could (or, in some cases, should) happen in the following 10-20 years. While I’m neither a prophet nor a futurist, I do think that there’s plenty of room for improvement, and some rather obvious ways in which the industry could be improved with the use of brand new technology. It’s fun to imagine where our favourite hobby could go in the future, and how it could develop to perfection. However, it’s very important to note that among the entire gambling industry (which incorporates online casino, betting, bingo and more), there’s one category that has been absolutely perfected by current technology, to the point where I have no idea if it’d even be possible to improve it any further. That, my friends, is the lotto gambling.
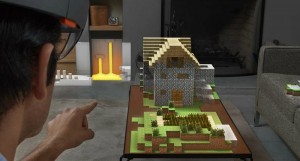 Impressive, isn’t it? The HoloLens have multiple applications (another one I liked was the ability to open a “portal” to the “Minecraft” world on your wall and peek through it in three dimensions, as if it’s really a hole in the wall connecting you to a physical world on the other side. But my favourite feature of all is the HoloLens’ ability to create physical objects that aren’t really there, and to give the user the ability to interact with them by touching them. In the demo presented at E3 (which showed something rather similar to the image above), the presenter was able to move the “Minecraft” world popping out of the table with his fingers, pulling it up in order to reveal the caves underneath the surface. Something like this could revolutionize gaming, and not just videogaming!
 If 10 years ago somebody had come to me and said “Hey, Charlie, in the future we’re gonna play casino games on our phones”, I literally would have laughed. Not even me, a science fiction expert who has seen “Star Wars” so many times that he can play the movie immediately as a one-man show, could believe that our clunky old phones that barely supported games like “Snake” could ever play casino games. But then the smartphone revolution happened, and all of a sudden everybody could see the potential of those little devices we previously used exclusively for talking. As technology marches onwards, we quickly discover new ways to use it that would’ve seemed ridiculous only a few years prior. With that in mind, let’s take a look at a few devices that are being developed right at this very moment that could revolutionize the future of online gambling.
 What does the future hold for online gambling? Are our grandkids still going to be clicking away and watching virtual rolls spin on flat screens, or are they going to play in a holographic representation of a casino inside their own room, with their personal android serving as a dealer? Nobody knows for sure, but it’s always fun to look at the past and try to guess the future based on it. After all, history does repeat itself, and while there are always differences, we can always at least try to get a general idea based on what we know.
 Hey there, replicants! A few weeks ago, I spent a few hours just lying in bed thinking about what the future of online casinos might hold while I was supposed to be sleeping. Sure, the next morning I could barely get up for work, as I’d only had about 3-4 hours of sleep, but considering the fact that I reached some pretty interesting conclusions which ultimately inspired this site, I’d say it was worth it! I’m going to share my ideas about the future in a series of articles, each examining a different subject. You ready? Let’s get cracking!
 Gamesys company’s founder and former CEO Noel Hayden has steps back and his place will be taken by the company’s COO Lee Fenton. This was announced at the staff member meeting last week. After the £425.8m acquisition of the company by the Canadian group Intertain just a few months ago, this is the second step towards the restructure of the gaming company. Noel Hayden will become Executive Chairman of the company.
 See the logos above? They belong to the Gambling Commission and eCogra, two of the numerous organizations that make sure casinos are legitimate. The
  Hello, and welcome to my site! My name is Charles McKay, and while most people call me Charlie, my closest friends have a different nickname for me – Deckard. I know it doesn’t sound like anything close to Charlie, but as you may have figured out it’s also the name of the main character of “Blade Runner”, one of my favourite movies. I absolutely adore sci-fi, and all things futuristic. It’s always really fun to speculate about what exactly the future holds for us, if anything at all. Are we going to be purchasing androids in 100 years? Are we still going to live on Earth? Or are we going to be fighting for survival in a post-apocalyptic wasteland? No one really knows for sure, safe for the few time travellers among us (I know you’re there!), but it’s still very fun to speculate! Another thing I really enjoy are online casinos. Yeah, that came out of nowhere, didn’t it? But if you think about it, online casinos are extremely futuristic – only fifteen years ago the only way you could bet money on, say, slots, was if you planned an expensive night at a local casino – or even a road trip, depending on how far it was. In 2015, you can do that from your phone wherever you are. If that’s not futuristic, I don’t know what is! Casino games will still keep developing as the 21st century unfolds, though, and after a few rather stimulating conversations with my friends I decided to make this site and explain some of my ideas about the future of online gambling. I’ll try to explore the subject in several articles while also posting news, links and other interesting material that I believe relates to the subject of online casinos. I hope you find my site to be interesting and informative!